�r�g��2010-08-14 10:56��Դ���{���w�з��g ���ߣ�admin �c������
|
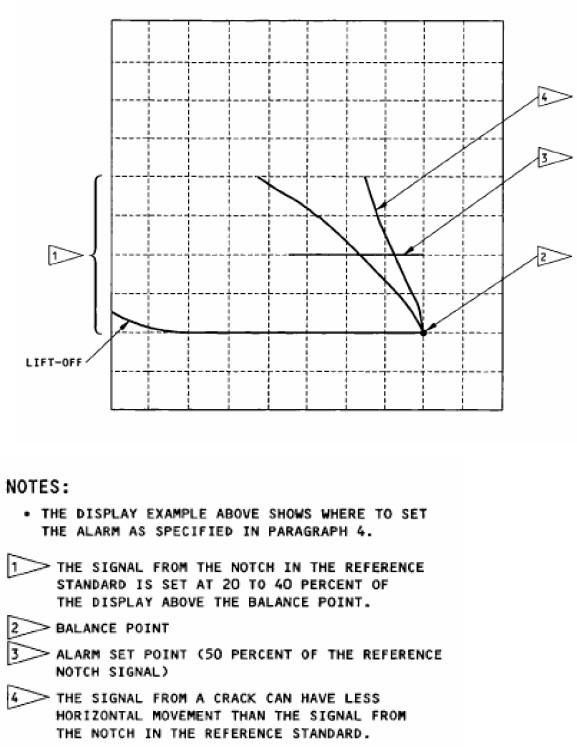
�ăx���˶�Instrument Calibration A. Set the frequency between 50 and 500 kHz. NOTE: To examine scribe lines, set the frequency between 50 and 150 kHz if possible. B. Calibrate the instrument with the applicable reference standard. Paragraph 5.E. identifies the different types of structural configurations that can be examined. The reference standards to use for the different structural configurations to be examined are: (1)Large Areas, Near an Edge, On an Edge, Radius: Use reference standard 126. NOTE: To examine an area where scribe lines have been removed, and before more material is removed for an insurance blend, it is permitted to use a reference standard with a notch depth as small as 0.008 inch (0.20 mm). It is not permitted to use a notch depth that is less than 0.008 inch (0.20 mm). Before you blend scribe lines, make sure it is permitted in the repair instructions. (2). Flush Head Fasteners: Use reference standard NDT1048. (3) Protruding Head Fasteners: Use reference standard 188A. C. Set the vertical to horizontal gain between 2:1 and 4:1. D. Set the filters as follows: (1). Set the high-pass filter to off or zero Hz. (2). If the instrument has a low-pass filter: (a) Set the low-pass filter to its highest value (b).Decrease the filter value to get a stable dot. E. Put a nonconductive shim on the reference standard. The thickness of the shim must be equivalent (| 0.003 inch (0.08 mm)) to the paint thickness on the airplane. F. Put the probe on the reference standard at least 0.5 inch (12.7 mm) away from the EDM notch and the edge of the reference standard. G. Balance the instrument. H. Adjust the balance point to 20 percent of the display as shown in Detail VIII. I. Adjust the instrument for lift-off. Adjust the phase control so that the lift-off signal moves horizontally to the left when the probe is lifted off of the part surface. J. Move the probe across the notch in the reference standard. K. Adjust the gain to get a signal that is 20 to 40 percent of the display above the balance point as shown in Detail VIII. L. If the instrument has an alarm, set the alarm as shown in Detail VIII. M. Move the probe across the notch in the reference standard to find the maximum scan speed. The scan speed is too fast if the signal is less than 90 percent of the calibration notch signal. NOTE: Higher scan speeds are possible with a higher low-pass filter value. 
|